Coming out of 2024, I felt completely drained. Years of burnout had tangled into a dense knot of tension I could practically feel sitting in my chest. I knew I needed to redirect that energy by transmuting it into something playful, light, and maybe even a little freeing.
That’s how I ended up fixating on butterflies.
Why Butterflies?
Throughout 2025 so far, I’ve been on a bit of a butterfly tangent. Maybe it’s because butterflies are known to represent transformation, personal growth, freedom, and new beginnings. These are all universal themes that apply to the human condition, which is why so many of us relate to them. I know the meaning completely resonates for so many, including myself.
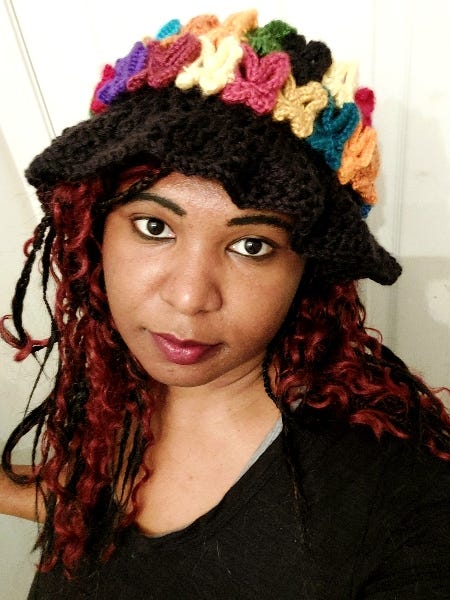
Wearing the butterfly hat
Personally, I don’t see enough butterflies around where I am anymore, so I created a world where they keep company on my cranium — and if you prefer it that way, on yours as well! We’ve got a butterfly squad on our hands. Well, more like our heads.
They’re all soft, colorfully vibrant, and ready to fly out of this madness.
Crocheting Through It
I started the pattern for the butterfly appliqué on December 24, 2024. The idea came together slowly over the next month. I knew I wanted to make something wearable but wasn’t sure what form it should take. A top? A bag? A scarf?
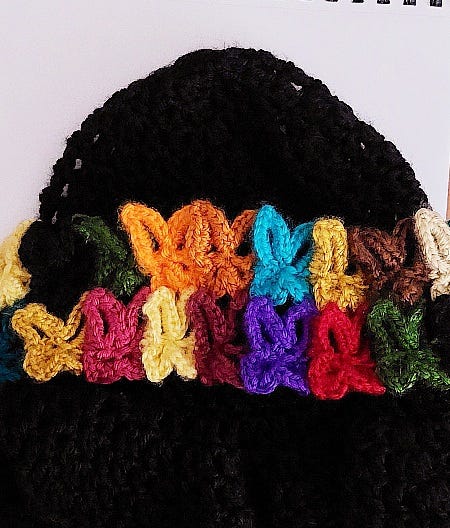
Eventually, I settled on a mesh hat. Something light and open, but with enough structure to serve as a landing zone for a whole butterfly crew.
From there, the concept just spiraled — in the best way yet.
Many months passed since that time, and now we’re here. It took a lot for me to reach a point where it felt I could finally get this out there, but we’re finally here.
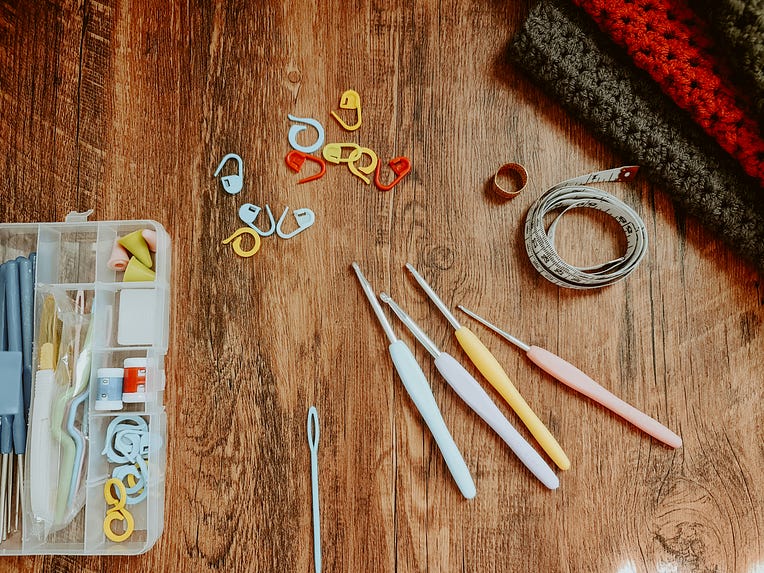
Tools, Stitches, and Materials
This butterfly shape is built from a magic ring, and is about 2 rows to make. However, the hat actual hat (sans butterfly garland) is created using some variation of the filet stitch. In this case, I used the standard double crochet (dc) to build the filet stitches.
To create this hat, I used:
Medium (4) weight yarn
Caron’s Simply Soft Yarn in multiple colors
A pair of scissors
Stitch markers
1 darning needle
And a whole lot of emotional unraveling.
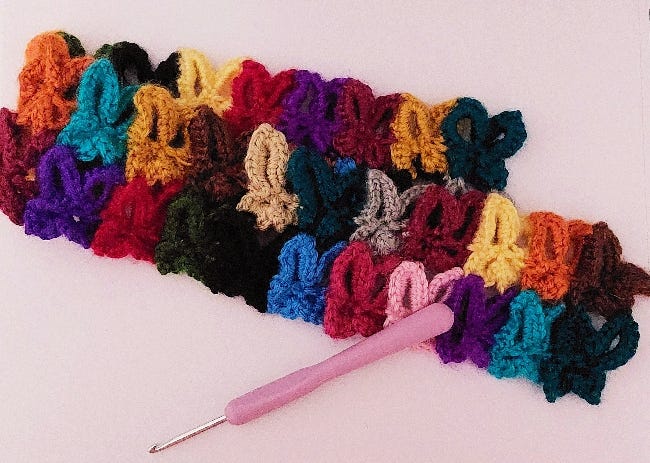
Butterfly Garland Construction
Here’s how the butterfly garland works:
Each butterfly is created individually, starting with a magic ring.
They’re then crocheted into a single garland row by joining their top wings together at their edges.
The full design is multi-tiered, meaning one row of attached butterflies sits atop another. To achieve this:
The top wings of one butterfly row are connected to the bottom wings of the row above.
This creates a layered, almost floating effect where each butterfly slightly cascades off the one(s) before it.
And the result? A vibrant garland of fluttering forms that feels alive with movement.
Level of Difficulty
This pattern is beginner-friendly with a touch of intermediate flair. If you’re comfortable with the basics , like:
Chain stitches (ch)
Single crochet (sc)
Slip stitch (sl st)
Making a slip knot
Forming a magic ring
— you’re already good to go! Now, the more intermediate challenge comes in when you’re joining the butterfly appliqués together, especially to create the layered garland effect. But don’t worry — with a bit of patience and practice, it’s absolutely doable (and worth it).
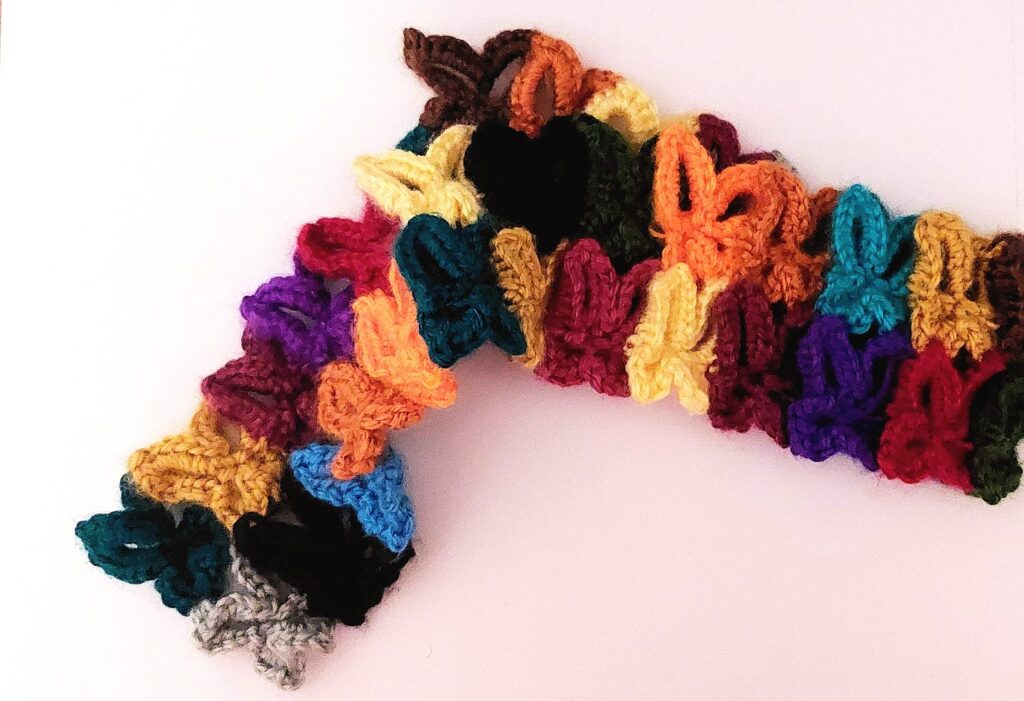
Optional: Sewing on the Garland
Now, here’s the controversial part (don’t come for me):
You do not have to sew the garland onto the hat. Why? Because maybe you want to switch it up. Maybe you haven’t settled on a base hat color yet. It could also be that you just want to swap the garland across different hats depending on your mood or outfit. You may even choose to wear it as a stand-alone headband!
That said, I personally chose to sew mine on out of sheer preference. But this part is definitely up to you! Let your butterflies be as free as you want them to be, really. : )
Final Thoughts
This butterfly hat isn’t just a hat. It’s a symbol of everything some of us may be pushing through. Of what it means to take your burnout and channel it into something soft, bright, and a little whimsical. It’s a wearable metamorphosis — a way to remind myself (and maybe others) that sometimes, even in the messiest of cocoons, something beautiful is waiting to unfold.
We’re all tired in some way. But maybe, just maybe, we can stitch something joyful out of that exhaustion.
🦋🧶
P.S. I’m working on a video tutorial breaking down the process of creating the butterfly appliqué using a magic ring for those who want to try it themselves. For anyone interested, it will be posted soon. Happy crocheting!
What about you? Have you had a moment where a small creative act shifted your whole day?
A butterfly is more than a colorful form that flutters through the air. It’s also geometry in live form. A living proof of balance that manifests as one of the most eye-catching insects out there. Each wing mirrors the other with precision, shaped not just by genetics but by the logic underlying equations, algorithms, and stitches. Nature crafts them how a maker works with yarn: step by step, pattern by pattern, or until symmetry becomes second nature.
This post is for anyone who’s ever thought math could be more approachable — especially when viewed through the lens of other mediums, like code and crochet. In this post, we continue our journey of visualizing math through art by exploring the butterfly curve. A polar equation that captures the symmetry of nature, giving these creatures their wings to fly.
This is my personal way of connecting the butterfly curve to crochet techniques. It’s not a formal mathematical or crochet standard.
How did the butterfly curve come about?
The origin of the butterfly curve can be traced back to 1989. It was discovered by Fay H. Temple, and his findings were originally published in The American Mathematical Monthly. Art and science do not have to be mutually exclusive to appreciate an overlap, and Temple alludes to this, saying:
“The classical rose curves and the like do not seem to provoke much student enthusiasm, but sketching more complicated curves, with the aid of a computer, seems to spark more interest and often brings surprises.”
A look at the sinusoidal properties from trigonometry
The butterfly’s shape shares mathematical traits with other complex patterns found in nature. Particularly, through the sinusoidal waves of sine curves. These wave-like elements create the curved edges of butterfly wings, all converging from a central plane. In my previous article, I wrote about the mathematical properties responsible for how roses form when they grow. For a deeper understanding of how these equations work, you can read more about other polar equation types here.
This is denoted by the equation:
Figure 1. The Butterfly Curve Equation
Next, we look at how the butterfly curve combines exponential growth (exp(cos(t)), symmetry from cosine oscillations (-2 * cos(4t)), and fine detailing (sin⁵(t/12)) to create a shape that grows and contracts in a consistent way across all four quadrants. These mathematical terms together allow the curve to capture the symmetrical outline of butterfly wings, with both large-scale structure and intricate detail.
You can graph the curve hereon the Desmos calculator. This equation features three major parts inside the parentheses. Each term represents a different main section of the butterfly.
Looking at the equation from the perspective of crochet
Additionally, I thought it would be helpful to break down the equation into its respective zones on the coordinate plane. Specifically, we gain a clearer image by analyzing how the top, bottom, left, and right butterfly wings form. Then, we will examine this through the scope of a crochet project to better understand its real-life application.
1. Defining the Butterfly’s Body
The term e^cos(t) forms the central part of the butterfly anatomy. In crochet terms, it’s like creating a longer foundation chain that spans from the head down to the bottom to shape the body.
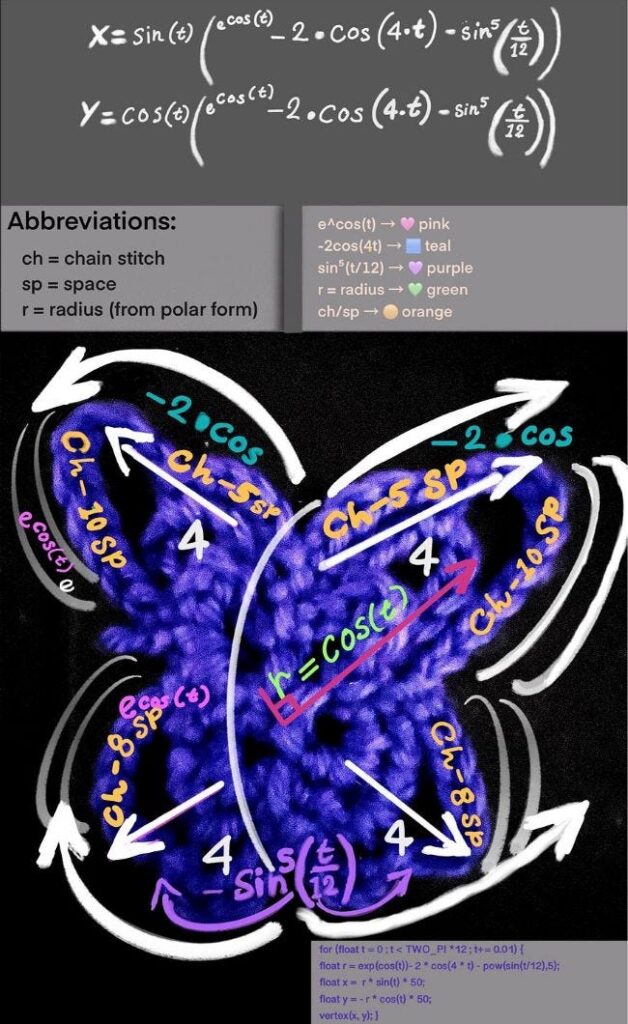
Figure 2. A hand-drawn diagram showing how the butterfly curve equation and computer code coincides with the different parts of a crocheted applique.’
The letter e, also called Euler’s number, stands for the base of the natural logarithm. It essentially represents either growth or decay. For the butterfly curve specifically, it shows growth, acting like a volumizer of scale and adding fullness to the wings as t changes.
2. The butterfly’s amplitude and symmetry
The term –2·cos(4t) amplifies the radius and shapes the butterfly’s wingspan. It acts like a stitch multiplier, controlling how far the shape stretches from the center. The 4t factor causes the function to repeat four times over a full rotation, producing a balanced, four-lobed symmetry. The factor of 4 in cos(4t) oscillates four times over a full rotation of a circle (0 to 2π), which directly contributes to the four-lobed symmetry of the butterfly.
In crochet, this mirrors how gauge and stitch pattern define the size and structure of a motif — where repeated stitch groups shape volume and a mirrored symmetry.
3. Detailing
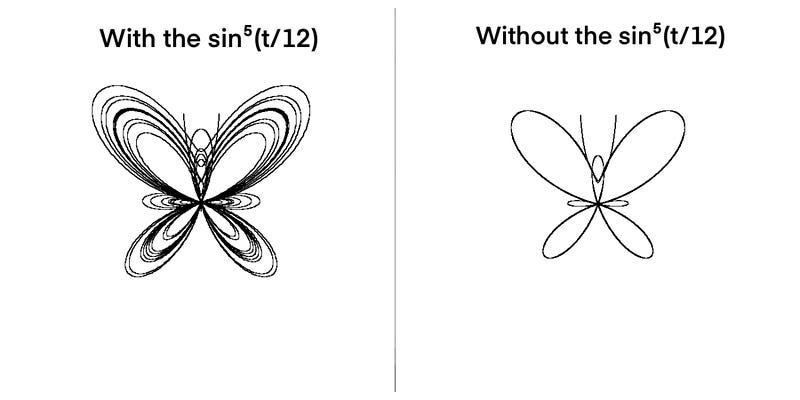
The term sin⁵(t/12) is the part of the equation responsible for giving our digital butterfly its detailed properties. Without this term, the butterfly would appear as a basic butterfly outline.
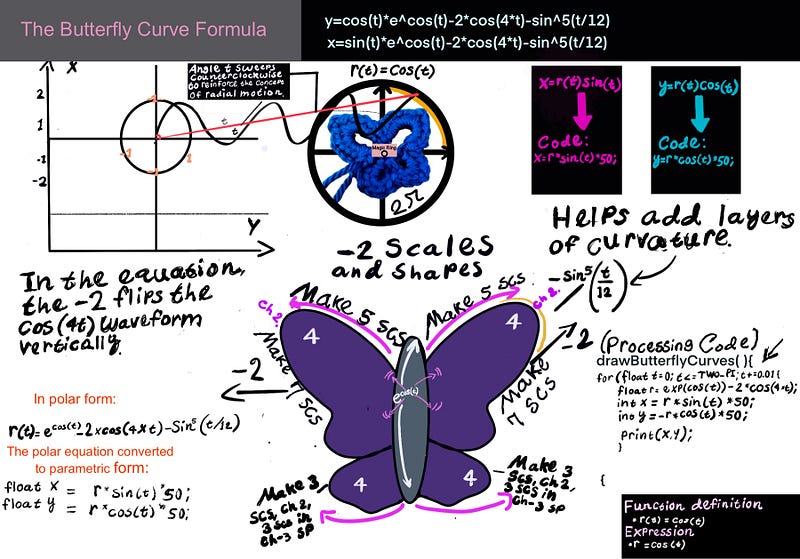
Figure 4. Diagram showing the parametric Butterfly Curve in Processing & crochet
This part makes the butterfly wings appear fine, with the ‘ripples’ resembling ridges along the edge of each wing. This part is comparable to the detailed work created within crochet projects, such as picots, frills, or edging.
The Role of Sine and Cosine in Wing Formation
The sine (sin) and cosine (cos) functions determine the respective y and x coordinates in a way that reflects their oscillatory behavior on a Cartesian plane. This means that these functions repeat in smooth waves, like the rise and fall of a swing or ocean waves. That repeating pattern helps draw the curved and symmetrical shape of the butterfly, as the input angle (in radians) varies.
Moreover, we look a bit further into how the mathematical equation behaves within a programming environment.
Visualizing with code: Math from the angle of programming
Now that we’ve studied how mathematics shapes the butterfly curve, let’s examine how this comes to life in the Processingprogramming environment under the Java language. Code translates the math into motion, plotting each point as the equation unfolds over time.
The for loop sets the variable t to an incremental value of 0.01, allowing the loop to step through the equation.
Defining vs. Drawing: Polar Equations and Parametric Plots
The butterfly curve is calculated in polar form — meaning the equation tells us how far from the center to go at each angle. However, to actually draw or render the butterfly, we need to convert the polar data into x and y coordinates, which is known as the parametric form. These coordinates let us plot each point of the curve in 2D space — whether on a screen, a graph, or a crochet project.
x =  r * sin(t) * 50;
y = -r * cos(t) * 50;
Note: In Processing, the coordinate system is flipped vertically compared to the standard mathematical graphs — the y-axis increases downward from the top of the screen. As Daniel Shiffman explains in Learning Processing, this setup reflects how computer screens draw pixels from top to bottom. To account for this, we use -r·cos(t) for the vertical (Y) position instead of r·cos(t).
The t+=0.01 in the for loop increments the angle slightly on each loop iteration, as it gradually moves through 12 complete cycles (or revolutions) around the unit circle. For t < TWO_PI * 10, the loop runs while t is less than 10 complete cycles of 2π (the usual range for periodic functions).
for(float t=0; t <TWO_PI * 12; t+=0.01){
 //Here, variables are initialized to work with the t incrementor.
}
Each cycle of 2π radians is one revolution around the unit circle, meaning the loop traces 12 revolutions (12 times around the circle). This step ensures smooth curves happen by creating many small steps. You may think of it like a spirographtracing loops: the more revolutions, the more detailed the final shape.
In our program, two main functions represent the shape. The functions drawButterflyCurves() and drawAntennae() perform the task of drawing a butterfly shape. These functions execute in the main function void setup().
The code that renders the butterfly in Java Processing:
float x, y;
float scale = 100;
//Left butterfly Wing

//Right butterfly wing

void setup(){
  background(255); //Sets the background color of the canvas to white
  size(650,650); //Sets the width and height of the canvas

}

void draw(){
 //Moves the origin (0,0) to the center of the canvas. This is important because the rose is drawn using polar coordinates, which are centered around the origin.
  translate(width / 2, height / 2);
 //drawButterflyBody();
drawAntennae();
drawButterflyCurves();

 //ellipse(0,0,0);
}
void drawAntennae(){
  stroke(0);
  noFill();
  bezier(-1, -40, -15, -60, -25, -80, -30, -150);
  bezier(1, -40, 15, -60, 25, -80, 30, -150);
}
void drawButterflyCurves(){

  stroke(0);
  noFill();
  beginShape();
  for(float t = 0; t <TWO_PI * 12; t+=0.01){

   float r = exp(cos(t)) - 2* cos(4 * t)-pow(sin(t/12),5);
    x =  r * sin(t) * scale;
    y = -r * cos(t) * scale;
    vertex(x,y);

  }
  endShape();

}
We use beginShape() to start defining a custom shape by plotting points. This function is always paired with endShape(), and together, they wrap around the code that calculates and places each point. Inside the loop, we use vertex(x, y) to add points based on the equation, and Processing connects them in order to draw the final shape.
Again, as described a bit earlier, the statements in the program x = r * sin(t) * 50 and y = -r * cos(t) * 50 reference the Cartesian coordinates. The negative sign in y = -r * cos(t) * 50 flips the vertical orientation of the curve.
In Processing, the y-axis grows downward, unlike standard math graphs. The minus sign flips the butterfly right-side-up, preserving its symmetry. Without this, the butterfly would appear upside down. If we hadn’t flipped the orientation, the butterfly would appear upside down. This is because the y-axis increases downward in Processing, unlike the upward-increasing y-axis in traditional Cartesian graphs.
Once again, the term exp(cos(t)) in the context of Processing causes the butterfly to scale dynamically, as if it’s breathing in and out—inflating and contracting along the curve. Much like how a crochet artist builds rows that expand or taper, this exponential term uses the wave-like motion of cos(t) to stretch the shape outward in some places and draw it inward in others, creating the illusion of a living, expansive form.
Similarly, pow(sin(t/12),5))—equivalent to (sin⁵(t/12))—raises a stretched sine wave to the fifth power, smoothing valleys and sharpening peaks. This adds refined ripple-like textures to the wings. Much like decorative stitch work in crochet.
In terms of the Bezier curve function values that set up the antennae, I suggest playing around with the values to determine what works and what doesn’t. Much of the process involves trial and error, and it’s a great way to practice!”
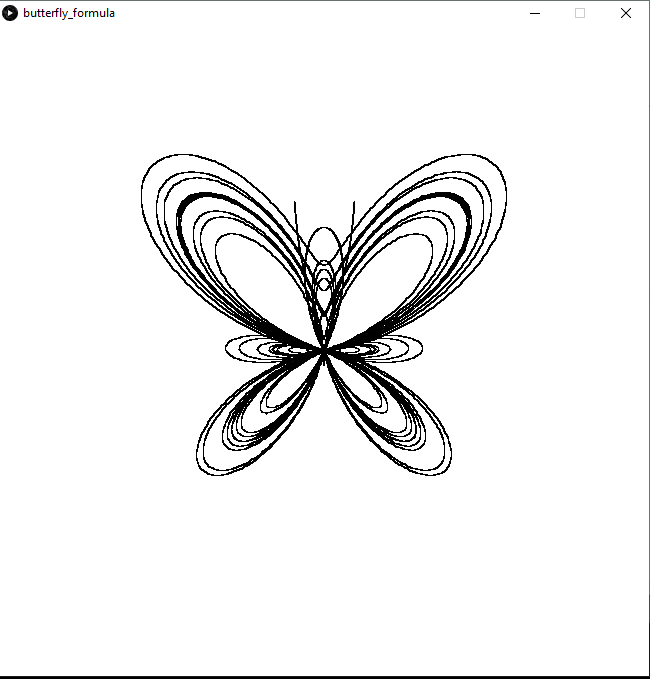
Program Output
Figure 5. Program output from the code.
Try experimenting with the equation to see how each part shapes the curve. For example, I altered the equation slightly each time I ran the program to see what parts of it affected how the butterfly appeared.
Here, I omitted the portion of the equation responsible for detailing (sin^5 (t/12)
Figure 5. Program output showing how omitting a portion of the formula impacts the appearance.
Translating Math Into Crochet
Finally, let’s take what we explored through programming a step further. Here, we duplicate the results. Only this time, those results are put into physical form as crocheted items.
Figure 6. Showing a more open outer wing design.
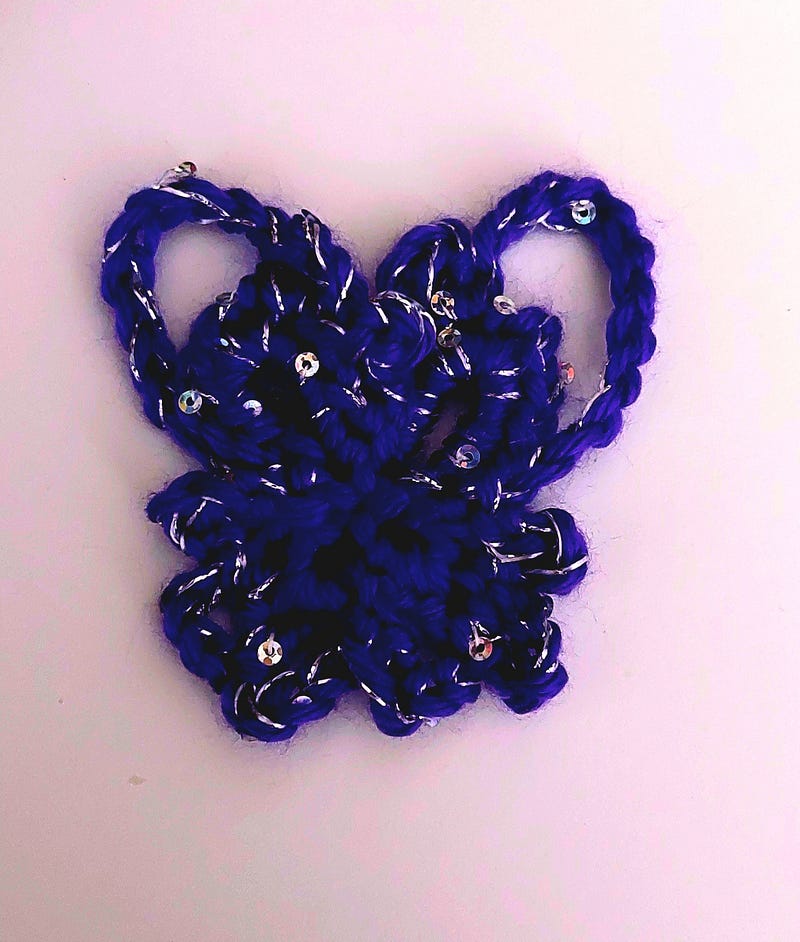
In this way, each chain and slip stitch worked from the center helps form the butterfly’s body, mirroring the central part of the mathematical curve. The larger loops extending outward represent the prominent upper wings, while the smaller loops below correspond to the shorter, lower wings.
Crocheting the butterfly appliqué
This butterfly pattern starts with a magic ring (or a chain-space, alternatively) and builds out using just chain stitches. That’s pretty much all that’s needed to create the foundational outline of the butterfly. From there, it’s all about stitch choice, shape preferences, placement, and repetition to bring the wings to life.
Figure 7. An assortment of different butterflies showing a design that builds upon the foundational row of establishing a butterfly shape.
I use crochet abbreviations like ‘ch’ (chain) and ‘st’ (stitch) throughout this example. But if you’re new to crochet or not yet familiar with these terms, you can find a complete list of abbreviations and their meanings, Crafty Yarn Council gives a more detailed list [here].
Crochet Steps Summary:
Like the butterfly in the equation or the programming environment, the crocheted butterfly follows the same fundamental logic: repetitive instructions done in a specific order to produce a recognizable shape. In this case, our chain stitches and structured loops work as replacements for variables and other types of control flow in the program. Yet, the essence is the same.
1. Initialize the center:
Using your crochet hook and yarn of choice, start with a magic ring or a loop to define the butterfly’s core. This creates the central point from which all symmetry extends.
Start Center: Magic ring or ch 3, join w/ sl st.
2. Create foundational loops:
We can create as many chains as needed for the bottom wings. Use these chain stitches to outline the axes of the wings. You may even think of these loops as scaffolding in the program or as the axis for the diagram.
Lower Wings: [Ch 3, sl st into ring] × 2.
Upper Wings: [6 sc into ch-7 sp, ch 2, 5 sc] × 2.
3. Build symmetry through repetition:
As we work our way from the center (magic ring), we fill in the wing outlines (chain spaces) by repeating any sequence of stitches with chains, single/double crochets to form the wings.
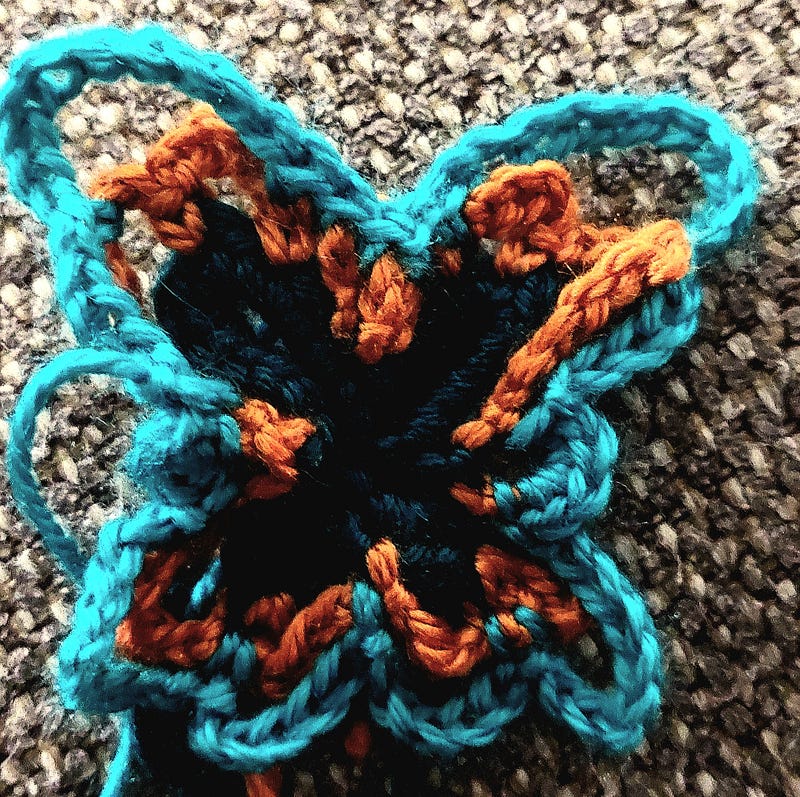
Figure. 8. A different butterfly variation showcasing the four-quadrant layout in the physical world.
Lower Wings: [3 sc into the ch-3 sp, ch 2, 3 sc] × 2.
Upper Wings: [6 sc into ch-7 sp, ch 2, 5 sc] × 2.
4. Anchor at defined points:
The slip stitches or joins from previous steps create new points upon which we can anchor new stitches. They return the sequence to the center or pivot points , creating closure and reinforcing the shape.
Anchor: Sl st between spaces that form the wings.
5. Add optional decorative elements:
On the third row, add more stitches and chain spaces to build upon the foundational butterfly shape. Use picots, puff stitches, frills, or shells to enhance each wing quadrant.
Secure and fasten off, optionally adding antennae or border details. The resulting form resembles a natural butterfly and a plotted figure — symmetrical, modular, and shapes the typical outline.
Finish: Fasten off, weave in the ends, and add antennae, if desired.
Closing the Butterfly Equation
We explored how a single shape, the butterfly in this case, can transform across different contexts. Whether it is found in nature, drawn through mathematical equations, rendered in code, drawn on paper, or handmade with yarn, all versions are connected by the same underlying math.
A Butterfly Garland
When we look closer at the mathematical concepts playing out before us in the world and how shapes are formed, everything falls into perspective.
Let’s keep exploring together!
If you enjoyed learning about the connection between mathematics, butterflies, crochet, and code, don’t forget to follow me for more creative explorations.
❤️ Enjoyed this post? 🧶 Share with a fellow maker ✨ Follow for more math-meets-craft stories 💬 I would love to hear your perspective on this topic. Tag me or comment below
Apart from knitting, crocheting is one of the most popular crafts out there that allows for a broad range of projects to shine. Crochet ideas unearth potential skills, techniques, and maneuvers of varying levels of expertise that often lead to great crocheted pieces.
Crochet work can result in projects that range from decorative to functional through a wide range of dynamic, expressive designs.
In this post, I explore the properties associated with common crochet stitches.
The Foundational Stitches:
Here, we are starting from the bottom and building up a potential project from the ground up.
Photo by Author
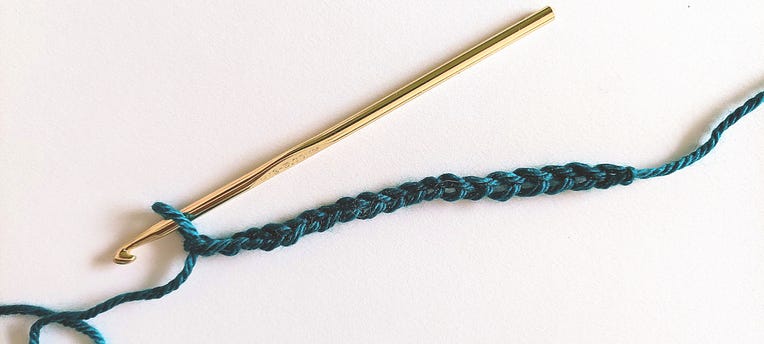
The chain stitch is the starting point for any crochet project to get off the ground. The chain stitch, single crochet stitch, and the half-double crochet stitches are among the most primitive stitch types before the crocheted works blossom into a scarf, a pair of socks, a hat — even a wearable garment, such as a dress, a skirt, or a pair of pants.
By chaining any number of stitches with a hook, one can create the first instance of a crocheted item.
All crochet projects begin with:
Chain Stitch (Ch): This is the starting point for most crochet projects, forming a row of linked loops that serve as the foundation for subsequent stitches.
Single Crochet (sc): This simple stitch creates a tightly woven fabric, perfect for sturdy and structured projects.
Half-Double Crochet (hdc): Slightly taller than the single crochet stitch, this one offers more drape while maintaining density, suitable for a variety of projects.
One stitch pattern alone is enough to create any beautiful crochet project.
For example, a charming hat can emerge using a single crochet, half-double, or any one type of stitch pattern at a time.
While slip stitch is not popular as a stand-alone stitch pattern to carry an entire project, with a great outlook and perfect planning, it still can yield beautiful results.
It is a versatile stitch that can pick up height as it progresses. However, the slip stitch (sl st) is the shortest stitch by far!
2. Building Blocks of Texture:
We are now in the double crochet group. As I call them, they are known as the zenith stitches. These are the stitch types that pick up height very quickly!
Double Crochet (dc): Versatile and commonly used, providing speed and flexibility in creating projects. The double crochet stitch requires one yarn over the hook. (One wrap, two pull-throughs)
Treble Crochet (tr): Treble stitches, taller than double crochet stitches, are perfect for lacy designs and openwork patterns. Treble crochet stitches add enough height for a project to expand quickly, depending on the number of rows required, the size of the crochet hook, and the type of yarn chosen. (Two wraps, three pull-throughs)
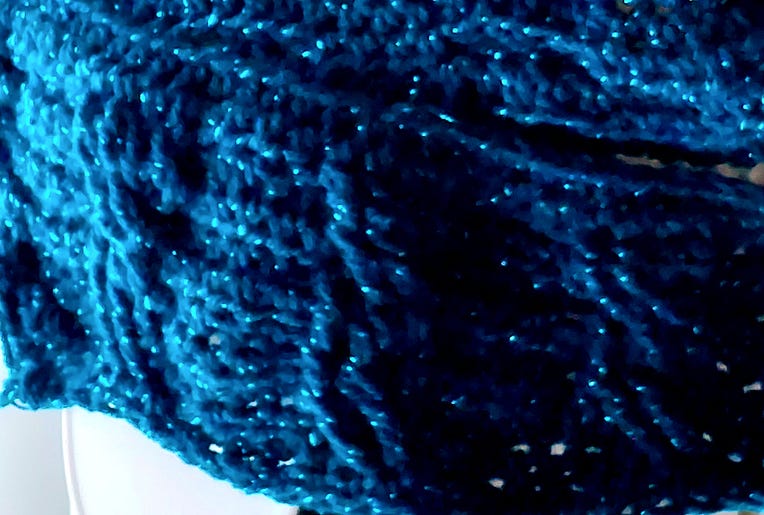
Treble crochet stitches can travel from their current position and extend to the next row or stitch. Crochet work that incorporates the treble stitch can easily render a cabling method. What is the cable method? Cabling in crochet work is achieved by using post stitches to crochet treble stitches around previously made treble stitches.
A scarf that has a cabling pattern
Double Treble Crochet (dtr): An elongated stitch ideal for creating intricate lace patterns and adding depth to projects. The double treble stitch is quite identical in structure to the first two double crochet variations in that it also requires several yarn-overs to add height. It is at the third level of the double crochet group and produces some of the tallest stitches possible. Now, for the double treble stitch, it takes not one, not two, but THREE yarn-overs to complete. (Three wraps, four pull-throughs)
3. Decorative and Dimensional Stitches:
Popcorn Stitch: Creating raised, textured bobbles reminiscent of popcorn, adding dimension and visual interest to projects.
Bobble Stitch: Similar to the popcorn stitch but with a rounded shape, perfect for embellishments and surface textures.
Puff Stitch: These types of stitches are repeatedly pulled up on the hook and taken through several loops to create clusters that form a puffy texture. This effect is a great method for creating embroidery, blankets, and accessories.
Spirals These are made by inputting a heavy concentration of stitches into one stitch for one or several stitches in a row. This stitch technique produces a curling effect that resembles a spiral.
4. Advanced Crochet Stitch Types Now these kind of stitches expand on what the earlier (foundational) stitches have already established. A group of stitches working together to form more complex patterns.
Shell Stitch: Shells are created by combining multiple stitches into the same space to form a cluster. Doing so can create a shell-like motif, often used for edging and borders.
Basketweave Stitch: Alternating front and back post stitches to create a woven, textured fabric resembling a basket weave.
Tunisian Crochet: A unique technique that combines elements of crochet and knitting, creating dense, textured fabrics with a distinctive look. Anything can be created using the Tunisian approach.
The smock stitch for Tunisian crochet:
Photo by Author
5. Beyond the Basics:
Now, all the stitches are being combined into a group (or clusters) to create more dynamic patterns, and here, we are beginning to expand by including all the stitches we explored earlier.
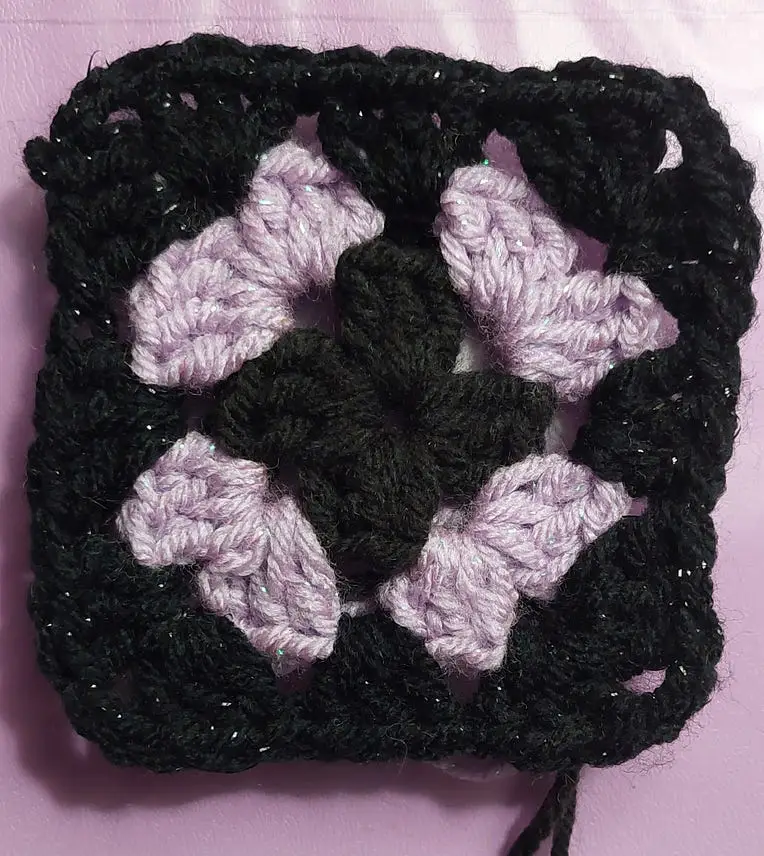
The Granny Square: A classic motif made up of clusters of stitches worked in the round, versatile for creating blankets, garments, hats, and more. The granny square pattern is achieved by crocheting a group of double crochets together.
A 3-tiered, four-sided granny square. Photo by Author
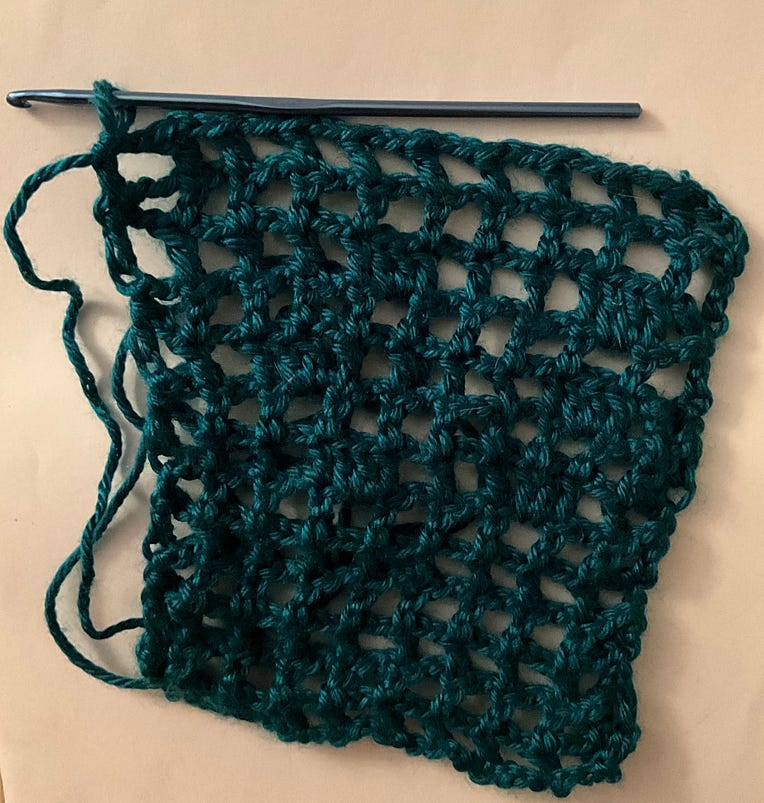
Filet Crochet: This crochet sequence creates open or filled squares (closed work with stitches filling the empty spaces) to create intricate lace patterns and images, perfect for heirloom-quality projects.
The filet method is a personal favorite of mine because it creates a more openwork fabric for pieces to flow.
Also, the filet fabric is a mesh/netting type developed to create fashionable pieces such as dresses, scarves, shawls, and other fashion items that give a light, breezy feel when worn.
Photo by Author
Hopefully, this post provided a comprehensive guide to crochet stitches for any beginner looking to try it as a new hobby. The possibilities are endless for what unfolds from a strike of inspiration.
Whether you’re a beginner exploring the fundamentals or an experienced crocheter seeking new challenges, these stitches will inspire you to create stunning works of art.
So pick up your hook, choose your yarn, and let your imagination run wild as you embark on your next crochet endeavor!